Low-fidelity prototyping: What is it and how can it help?


Share Low-fidelity prototyping: What is it and how can it help?
Explore more from
Design basics
Bring designs to life with prototypes
Share flows, gather feedback, and iterate fast with Figma.

Whether you're a UX designer exploring mobile app concepts or a digital product owner kicking off a feature design sprint, low-fidelity prototypes are the keys you need to unlock creativity. With these simple mockups, you can quickly test and validate your design concepts.
Read on to learn more about:
- What is low-fidelity prototyping
- How your team can use low-fidelity prototyping to design stronger final products
- How to make a low-fidelity prototype in four simple steps with Figma
What is a low-fidelity prototype?
A low-fidelity prototype is a simple diagram of an early-stage design concept. UX design teams use them to quickly test an idea, identify gaps and pitfalls, and discard product designs that don’t resonate with users. An important step in the design thinking process, low-fidelity prototyping drives ideation and innovation for basic page layout, content organization, and user flow.
Types of low-fidelity prototypes
Designers use two types of low-fidelity prototypes: paper prototypes and wireframes.
Paper prototyping involves sketching basic user interfaces onto a piece of paper or a whiteboard. Designers and key stakeholders use these low-fi prototyping tools to rapidly capture ideas for a new or redesigned user experience. While offline prototypes can generate useful internal feedback with small teams, online whiteboards facilitate prototyping with larger, hybrid teams.
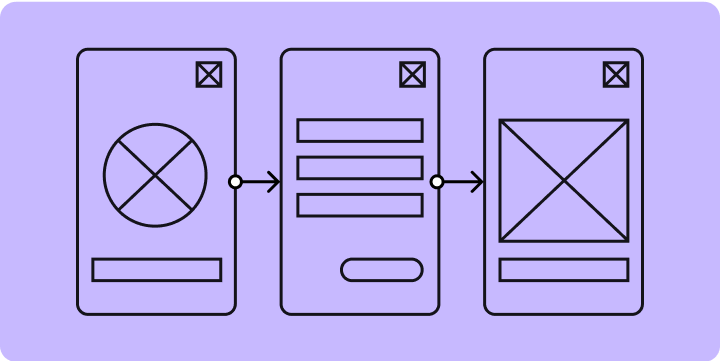
Wireframing uses simple blueprints of digital screens to capture basic layouts and content hierarchy. Wireframes can also show user interactions in a user flow, which can be helpful for usability testing. Pro tip: Figma's wireframing tool helps you build low-fidelity assets you can easily sync with your design system components.
Benefits of low-fidelity prototypes
Lo-fi prototyping can have a big impact on the overall user experience. When used effectively, a low-fi prototype can help you:
- Collect relevant user feedback quickly. Users feel more comfortable critiquing works in progress (i.e., rough sketches or wireframes) than near-final designs. Prototypes with more features or a higher level of detail take more time to assess.
- Reduce product development risk by addressing user interface issues in the early stages of design and development.
- Streamline workflows by helping product team members avoid costly, time-consuming revisions later in the design and development process.
- Make changes on the fly in an agile design process that allows for quick and easy fixes.
- Collaborate with different teams. Strategists, developers, and project managers can build low-fi prototypes—especially online prototypes which don’t require design expertise.
What’s the difference because low-fidelity and high-fidelity prototypes:
Low-fidelity prototypes capture design ideas in rough whiteboard sketches or simple wireframes. Hi-fi prototypes have the look and feel of a finished product, with interaction designs that are practically pixel-perfect—they may include animations and clickable screens.
Both types of prototypes play key roles in product development. Low-fidelity prototyping takes place in the early stages of design, to model and test concepts before investing build time. High-fidelity prototyping happens at later stages, when you're ready to stress-test design functionality with robust user testing.
How to build a low-fidelity prototype in 4 steps
Any team can use lo-fi prototypes to sketch out compelling user experiences—no design experience necessary. Just follow these four steps to master lo-fi prototyping.
Step 1: Outline the problem you want to solve.
What design concept do you want to test to meet user needs or challenges? Work with your business and UX research teams to capture design goals in a clear problem statement.
Step 2: Outline core functionality.
What design elements and interactions are essential? Sketch out your basic design concept, capturing its structure and sequence with a simple storyboard or user flow.
Step 3: Develop your design.
Start outlining the screens in your flow. You could use paper or an online whiteboard—or apply readymade screen layouts with FigJam's prototyping template. Keep each screen simple and high-level, with limited interactions, transitions, and visual design. Stay focused on the problem you're solving.
Step 4: Test and iterate your ideas.
Share your prototype(s) with internal teams to align on a design direction. Then use the prototype of the selected design to conduct user testing, so that you can refine your design. Pro tip: Add notes or comments to your prototype to help team members and users understand where to focus their attention, and explain how key features may work.
Jumpstart your low-fidelity prototypes with Figma
When you're ready to brainstorm design concepts with your team, hop on FigJam’s online collaborative whiteboard. Or jump right into FigJam’s prototype template, and start sketching low-fidelity prototypes—no design experience necessary. For a refresher on the prototyping process, check out “What is prototyping” in the Figma resource library.
Pro tip: Check out low-fi wireframe kits shared by the Figma community for tools and inspiration. Over 20,000 designers have used Method’s paper wireframe kit, which was a Figma Community Awards finalist.
Ready to create and test your best design concepts yet?