19 MVP testing methods: When and how to use them
Share 19 MVP testing methods: When and how to use them
Explore more from
Team productivity


You’ve spent late nights perfecting every transition and polishing every frame, but the closer you get to launch, the more that nagging question grows: Will people use this? Every builder knows the weight of standing on the edge of a big release, unsure whether the idea will work for users.
MVP testing methods let you put your prototype in front of people to see if your solution sticks. Minimum viable products (MVPs), like landing pages or clickable walkthroughs, help you check your assumptions and turn guesswork into a clear path forward. That means fewer months wasted on features that don’t land.
Read on to learn:
- Why MVP testing matters
- How to prepare your prototype for feedback
- High-impact MVP testing methods
- Choosing the best approach for your goals
- Best practices and common pitfalls
Why is MVP testing important?
A prototype is just a stack of assumptions until someone uses it. MVP testing is the reality check that keeps you from building a beautiful bridge to nowhere. By testing early, you protect the things that matter most: your time, your focus, and your craft.
Here’s why MVP testing is a must for any product team:
- You’ll identify fundamental flaws in your idea before you’ve committed to a full-scale build.
- It’s much cheaper to iterate on a prototype than to rewrite code.
- Focusing on the essentials means you can ship a functional product sooner.
- Showing user data from your tests makes it much easier to get stakeholders on board with the vision.
- Testing creates a direct loop between your brainstorming sessions and the user experience (UX).
Preparing for MVP testing
Before you start recruiting users or diving into data, you need a plan. Preparing for testing is about narrowing your focus so you can see what works and what doesn’t. Here’s how to set the stage for a successful test.
Step 1: Find your early adopters
Testing is only as good as the people behind the keyboard. If you recruit a general crowd, you’ll get general feedback that doesn’t help you move forward. You’re looking for early adopters—the people who feel the pain point so deeply they’re willing to try a rough, early version of your solution right now.
If you haven’t already, now is the time to lean on your user personas so that your testing group aligns with the expectations, behaviors, and technical comfort levels of your ideal users.
Step 2: Define your must-haves
Next, identify the one thing your product must do well to be worth building. Choose the essential features that prove your concept and focus your energy there.
Setting these goals early helps you decide what success looks like before the data starts rolling in. Whether you’re looking to see if users can complete a task or if they’re willing to sign up for a waitlist, having a specific target makes it much easier to decide whether you’re ready to scale.
Step 3: Set the scene
Your testing environment should feel as natural as possible. If you’re building a mobile app for people on the go, a formal office setting might give you skewed results. You’ll need to decide between moderated testing—where a researcher guides the user through tasks—or unmoderated testing, where the user explores on their own.
Most teams stick to digital or remote setups. You can easily share a prototype link and watch a user navigate via a video call or a dedicated testing platform. Whether you’re doing a live walkthrough or gathering heatmaps, the goal is to get out of the way so you can see how the product holds up.
Step 4: Choose your approach
Choose your approach, set a realistic timeline, and decide which metrics matter most for your product. Most MVP testing methods fall into a few buckets:
- Problem/solution fit tests: Validate that the problem you’re tackling is real and that your proposed solution resonates with people.
- Usability and UX tests: Help you see if people can navigate your MVP and understand how it works without getting frustrated or stuck.
- Demand and conversion tests: Measure interest. You’re looking to see whether users are willing to take an action—like signing up for a waitlist, pre-ordering, or clicking a “buy” button.
- Retention and engagement tests: Show if your product has staying power. You’re watching to see if users come back and keep using the tool over time.
Generally, you can divide these methods into low-fidelity and high-fidelity options. Low-fidelity tests are great for moving fast and testing ideas, while high-fidelity tests give you a clearer picture of how the final product will perform in the real world.
Low-fidelity MVP testing methods
Low-fidelity testing is the fastest way to validate your value and workflow before investing in high-fidelity design or code. Instead of focusing on the final look, these methods use sketches, conversations, and landing pages to confirm demand and problem/solution fit.
Here are the most common low-fidelity methods to help you get started.
Method 1: Paper prototyping
Ideal for: Testing navigation and workflow logic
Paper prototyping is as low-fidelity as it gets. You sketch your interface on paper—or use basic shapes in Figma Design to mimic the feel—to walk users through a flow. Because you can update the design with a pen or a quick tweak to a frame, it’s the fastest way to get your first round of feedback.
For example, if you’re building a fitness tracking app, you might sketch the three main screens on index cards instead of designing a full dashboard. To test it, ask the user to tap the paper as if it were a phone. When they hit a button, you manually swap in the next card to show the result. If they’re confused, you just grab a fresh card and redraw it right there.
Method 2: Landing pages
Ideal for: Measuring interest through demand and conversion tests
A landing page is one of the best ways to see if an idea is worth pursuing. You create a simple page that explains your value proposition and includes a call to action, like a button to join a waitlist or sign up for early access.
Let’s say you have an idea for an AI gardening assistant. You’d set up a landing page explaining the service and track how many visitors sign up. You’ll validate the concept and start building a list of early adopters at the same time, all for the cost of a single page.
Method 3: User interviews, surveys, and questionnaires
Ideal for: Confirming user pain points and problem awareness
Conversational testing helps you dig into the struggle before you build the solution. Whether it’s a deep-dive interview or a quick survey, you’re confirming that the problem you’ve identified is a priority for your users. You can also try quick-fire feedback sessions to get gut reactions from people unfamiliar with your project.
Method 4: Explainer videos
Ideal for: Gauging demand for complex or new-to-market value propositions
An explainer video walks through how your product would work using a screen recording of a prototype, an animation, or a narrated slide deck.
Dropbox is the classic example here. They famously released a three-minute video showing the product in action before the backend even existed. The overnight spike in their waitlist was all the proof they needed that they were onto something.
Method 5: Crowdfunding campaigns
Ideal for: Securing financial commitment and pre-orders
Crowdfunding lets you sell a vision before you’ve ever touched a factory floor. Platforms like Kickstarter or Indiegogo are a high-signal way to see whether people want your product, since they’re willing to pay upfront. You’ll have the proof and the capital you need to start building.
Say you’re developing a custom mechanical keyboard for designers. You could launch a campaign with 3D renders and a feature list. Reaching your funding goal validates the concept and builds a community of early adopters. If it fails, you’ve avoided the high costs of manufacturing a product nobody wants.
Method 6: Wizard of Oz MVP
Ideal for: Validating the product’s output before automating the backend
In a Wizard of Oz MVP, the front end looks like a working product, but a human is manually doing the work behind the scenes. While the user experience feels high-fidelity and polished, there’s no real backend or automation.
If you were testing an AI scheduling tool, you could use a high-fidelity Figma prototype to let users book meetings, then manually coordinate the calendar invites yourself. You’ll learn if the service is useful enough to warrant automation before you write the scheduling logic.
Method 7: Fake door testing
Ideal for: Measuring intent for specific features or upgrades
Sometimes the best way to see if a feature is worth the dev time is to pretend it already exists. In a fake door test, you add a button or link for a new tool and see how many people try to use it.
When a user clicks, you can show a “Coming soon” message, a waitlist sign-up form, or a short survey. Tracking that click-through rate gives you data on whether the feature is a priority for your users.
Method 8: Content and community validation
Ideal for: Testing market interest through social engagement
Before you build a product, try starting a conversation. Share your concept via a newsletter, a Discord server, or a social media series. You’re looking for signals like deep comments or shares that show people care about the problem you’re solving. Plus, you get a built-in group of beta testers for when you move to the next stage of product development.
Method 9: Competitor analysis
Ideal for: Spotting market gaps and learning from existing friction
You don’t have to build from scratch to test an idea. Find out what’s missing in the market by looking at how people use the tools they have today. Dig into user reviews, forums, and support tickets to find where current products fall short.
Start your design research by looking into these specific areas:
- Read App Store reviews to find common user complaints and feature requests.
- Search Reddit threads to find the clunky workarounds people use to solve a task.
- Audit the onboarding flow of a similar app to find where users get stuck or frustrated.
Method 10: PPC and ad campaigns
Ideal for: Measuring demand and validating your hook
PPC and ad campaigns help you see if your message sticks. You can run small-budget tests on platforms like Google or LinkedIn to see which hooks get the most traction.
You might run search ads for specific keywords to see if users are looking for a fix, or A/B test headlines to see which one resonates more. These low-cost experiments help you decide whether to keep moving or pivot your approach.
High-fidelity MVP testing methods
While low-fidelity testing validates your concept, high-fidelity methods look at how people use your product. These tests use true-to-life prototypes or early code to mimic the final experience. Below are the most common high-fidelity testing methods.
Method 11: Digital prototyping
Ideal for: Testing interactions and navigation logic
Prototyping moves your designs from static frames to a clickable flow, so you can test if your logic holds up. You’re looking for friction points, like buttons that are too close or confusing navigation, that drawings can’t show.
Tools like Figma Make speed up this process by turning your frames into code-backed prototypes using natural language. Because it keeps your structure and metadata intact, you get a prototype that behaves like the final product. This lets you iterate on complex ideas and polish the experience in one place.
Method 12: Feature flags
Ideal for: Validating live features with controlled rollouts
Feature flags let you ship code to production while keeping it hidden behind a toggle. You can release a new feature to a small percentage of your audience to see how it performs and monitor for performance issues.
If a new feature doesn’t land or causes a bug, you can flip the switch and turn it off instantly. For example, you might roll out a new search bar to 5% of your power users first. Once you see they’re using it successfully, you can feel confident scaling the release to the rest of your audience.
Method 13: Concierge MVP/manual-first MVP
Ideal for: High-touch services and personalized value
A concierge MVP is a Wizard of Oz test without the curtain. You manually deliver the service your product will eventually automate, and your users know it. It’s high-fidelity because the value delivered is the real thing, even if you’re just using a spreadsheet behind the scenes.
Handling the process manually helps you see where users find value and where they get stuck. You’ll clarify what needs to be automated and what can be stripped away once you’re ready to scale.
Method 14: Piecemeal MVP
Ideal for: Delivering a functional product with off-the-shelf tools
You build a piecemeal MVP by stitching together existing tools like Typeform, Airtable, and Zapier to create a working system. Using off-the-shelf software to handle the logic saves you from writing custom code while still delivering a final result to your user. This setup lets you test how your process holds up once all the moving parts are connected.
Method 15: Single-feature MVP
Ideal for: Making sure your main feature is worth expanding
A single-feature MVP strips your idea down to the one workflow. You build just the core interaction that solves the user’s biggest problem. If users find value in this loop, you have the proof you need to start expanding the product.
Say you’re making a new photo app. You might launch with a simple, one-click background removal tool. Seeing if people keep coming back to that feature tells you if it’s worth building a full editing suite later.
Method 16: Pre-orders
Ideal for: Measuring willingness to pay
A pre-order MVP asks people to buy your product before you build it. You set up a landing page that pitches your solution, complete with a working checkout button. Collecting upfront payments separates the people who just like your idea from the ones willing to spend money on it.
Method 17: 3D models
Ideal for: Judging scale and proportion in a virtual space
A 3D model MVP brings hardware or spatial designs to life on a screen. You create a detailed render that people can spin, zoom, and explore from every angle. Showing your audience a realistic digital object helps you gather immediate reactions to the form factor, scale, and aesthetics. Nailing these details in a virtual space saves you from paying for expensive materials and manufacturing rounds down the line.
Method 18: Beta testing
Ideal for: Catching edge cases before a public launch
Let’s say you’re weeks away from shipping a major update to your component library. Before opening the doors to everyone, you can let a small group use the live build in their daily workflows. This early access helps uncover weird bugs and unexpected friction points. Fixing these issues now means a cleaner and more reliable experience for the wider release.
Method 19: A/B testing
Ideal for: Settling design debates with data
A/B testing routes your audience to different versions of a design to see which one performs better. You serve variant A to one group and variant B to another, tracking clicks or sign-ups. Measuring usage data helps you move past gut feelings and see which layout connects with your users.
Say your team is torn between two different onboarding flows. Sending half your new traffic to a single-page setup and the other half to a multi-step wizard settles the debate with data. Whichever flow leads to more completed profiles is your winner.
Validate your ideas and assumptions
Discover how Figma Make supports the product development process from start to finish.
How to use Figma Make for MVP testing
The MVP builder in Figma Make lets you generate layout, logic, and structure using text prompts. Building your initial concept this way gets you to a high-fidelity design in minutes. Here’s how to build a minimum viable product with Figma Make:
Step 1: Start with a frame. Drop a new frame onto your canvas or grab an existing one from your team’s files. This is the base layer for your new concept.
Step 2: Prompt your design. Describe the problem you’re solving and the primary path you want users to take. Giving the AI context on specific features or layout styles helps it generate a functional UI and navigation structure instantly.

Step 3: Align with your team. Bring product and engineering into the file to review the generated screens. You can tweak the flows together using additional prompts until everyone agrees on the direction.

Step 4: Refine the prototype. Launch the interactive preview to see how the logic holds up. When you spot areas that need improvement, ask the builder to adjust the visuals or update the user journey on the fly.
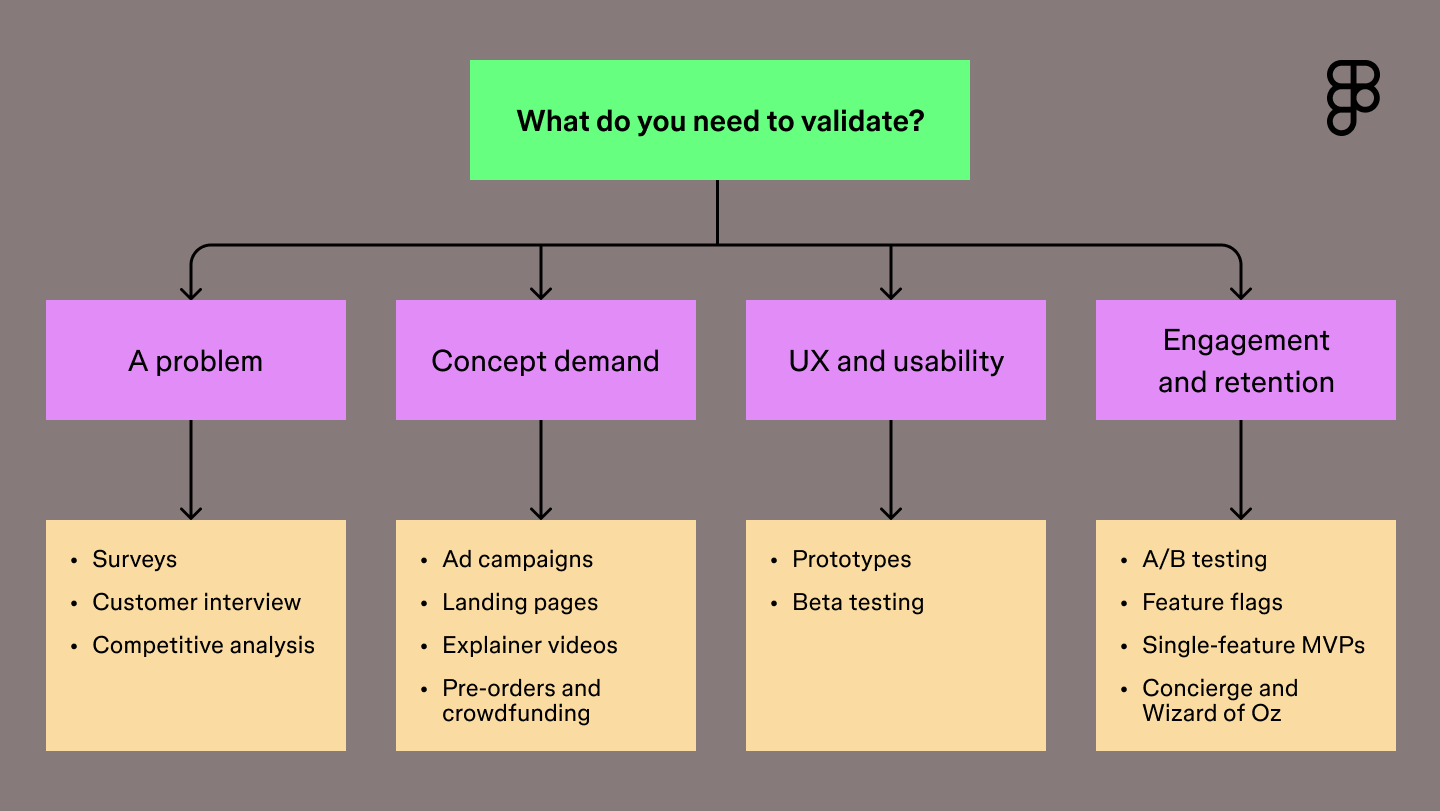
How to choose the right MVP testing method
Choosing the right method starts with pinpointing your riskiest assumption. Figure out the one thing that must be true for your product to succeed. You also need to factor in your audience. Developers might need a clickable prototype to offer solid feedback, while everyday consumers might just need an explainer video to grasp the value.
Match your technique to your current phase to keep momentum high. In the early days, lean on qualitative methods like user interviews to uncover the motivations behind user behavior. Once you have a working build, layer in quantitative data to prove those assumptions at scale.
The best insights come from blending both. A drop in your A/B test metrics tells you where to focus, and a quick follow-up conversation reveals how to improve the design.
Use the flowchart below to match your current needs with the right testing strategy.

What are the best metrics to track for MVP validation?
Every MVP test generates valuable data. Focusing on the strongest signals shows whether your core loop is working. Success looks different depending on the method you choose and your product, but a few key metrics universally indicate whether your concept has traction.
- Engagement rate: Track how often and how deeply people interact with your core features. High engagement suggests your solution fits naturally into their daily workflow.
- Conversion rate: Measure the percentage of users who take a specific desired action, like signing up for a beta or upgrading to a paid tier. This shows demand for your concept.
- Churn rate: Monitor how many people stop using your product over a given period. Keeping this number low is a sign that your MVP is delivering real, ongoing value.
- Customer acquisition cost: Calculate how much you spend to get a new user. A low acquisition cost indicates your messaging resonates and your market positioning is perfectly aligned.
Best practices for MVP testing
MVP testing is a natural fit for agile development. Building experiments into short sprints lets you launch features, gather data, and adapt based on real user feedback. These principles keep your team aligned and your feedback loops tight as you launch your experiments:
- Focus on value. Isolate the most critical feature to test. Launching the absolute essential workflow gives you a clear answer on whether your solution solves the primary problem.
- Target early adopters. Find the users who desperately need your product right now. People deeply invested in finding a solution provide the strongest signals for your team.
- Observe user behavior. Track how people navigate your tool using analytics platforms. Watching where users click and scroll reveals the unfiltered truth about their experience.
- Iterate quickly. Apply test results to the next build phase. Using fresh data to refine your concept keeps momentum high so you’re building toward what the market actually needs.
With Figma Make, you can get to a polished design in minutes and start gathering feedback right away, putting a realistic prototype in front of users before you’ve committed to a full build.
Here’s how Figma Make speeds up the testing process:
| MVP method | What you’re testing | How Figma Make helps |
|---|---|---|
| Single-feature | The core loop | Ship the generated UI with a smooth canvas-to-code handoff |
| A/B testing | Which layout performs better | Use the point and edit tool to prompt the AI to generate variant B |
| Concierge | The value of your solution | Pull styling context from your library so your service looks on-brand |
| Beta testing | Edge cases and friction points | Fix flows and test interaction models as a team on the multiplayer canvas |
| Pre-orders | Willingness to pay | Generate a high-fidelity checkout flow to collect payments |
Once the feedback comes in, you need a plan for what to tackle next. Try feeding your user insights into the AI roadmap generator to help your team prioritize the right features and map out a timeline for your next build phase.
Common pitfalls to avoid in MVP testing
It’s easy to lose sight of your objective once you’re in the thick of building. Knowing what mistakes to look out for keeps your feedback loops clean and your team aligned.
Watch out for these frequent missteps:
- Skipping user research. Anchor your concept in documented user pain points before getting started.
- Testing with the wrong crowd. Put your prototype strictly in the hands of early adopters who deeply feel the problem.
- Falling for feature bloat. Ship a lean, primary workflow so users focus entirely on the main problem you’re solving.
- Launching without clear goals. Define what a winning test looks like before you ever share the prototype link.
- Forgetting to document decisions. Capture your feedback in a shared workspace so you can build on it in the next sprint.
MVP testing methods FAQ
Keep reading for answers to frequently asked questions about MVP testing methods.
What tools are used for MVP testing?
To test MVPs, teams often use a stack that pairs high-fidelity prototyping with behavioral analytics to measure user intent. Figma Make leads this workflow by letting you generate and iterate on interactive prototypes that look and feel like finished products. To capture results, designers often layer in tools like Hotjar for behavior tracking and Maze or Typeform for structured feedback.
How does AI change MVP testing?
AI speeds up the testing loop by helping you generate prototypes and research assets in a fraction of the time. You can use it to draft interview scripts, analyze large sets of user feedback for patterns, or build clickable flows from a prompt. Shifting these repetitive tasks to AI lets you focus your energy on high-level strategy and refining your product vision.
Which two aspects of a product do MVPs test?
MVP tests answer two main questions: Do people want this, and can we build it? Validating desirability confirms you’re solving a problem users care about, while testing feasibility proves your team can deliver the solution without hitting technical walls.
What are the best metrics to track for MVP validation?
Measuring success comes down to watching how people move through your product and where they find value. High-performing teams focus on activation and retention to see whether users reach the point where the product clicks for them and keeps them coming back. Pairing these with conversion rates and acquisition costs helps you see if the market is ready to pay for what you’re building.
How long should an MVP test last?
Most MVP tests run for two to four weeks, giving you enough time to gather a significant data set without losing momentum. This window allows you to see past the initial launch spike and observe how users settle into a routine with your product. If you’re testing a complex B2B tool, you might extend this to a full sales cycle to capture the full picture of the decision-making process.
How much does MVP testing cost?
The cost of an MVP test depends on your build’s complexity and your strategy for reaching users. Most teams keep expenses low by using internal design resources and using existing tools for feedback. Your budget typically covers software subscriptions for usability platforms, the ad spend required to reach your audience, and the time spent analyzing data to decide on the next build phase.
What is the difference between UAT and MVP?
An MVP helps you decide if a product should exist, while User Acceptance Testing (UAT) confirms it works before a big launch. You use an MVP to test whether your idea solves a problem for users, whereas UAT is the final polish to catch bugs and verify that the build meets your technical specs.
How many users are needed for MVP testing?
For qualitative feedback, talking to five to ten people is usually enough to spot patterns. If you’re running a quantitative test like a landing page, aim for at least one hundred visitors to get a reliable signal. To find the right crowd, look for early adopters who are already trying to hack together their own solutions to the problem you are solving.
What’s the best MVP testing method for a mobile app?
High-fidelity prototyping is the go-to for mobile because it lets users test native gestures and transitions without you writing a single line of code. Using Figma Make, you can quickly spin up clickable flows that look like the finished product to gather honest UX feedback.
While teams use tools like Jest or Detox for automated testing later, starting with interactive prototypes helps you validate your idea before committing to a full build.
Create and test your MVP with Figma Make
MVP testing methods don’t have to be complicated. You just need the right method for the moment. We hope this guide gives you a solid starting point. When you’re ready to start validating, we’d love for you to try Figma.
Here’s how to get started:
- Map out user flows in FigJam and prioritize your smallest viable feature set.
- Use Figma Make to generate high-fidelity prototypes in seconds and put clickable ideas in users’ hands.
- Present your findings in Figma Slides and hand off final specs to your developers with Dev Mode.
Ready to start MVP testing?
Use Figma Make to validate your product ideas.
Keep reading


What is product design?
Product design and UX design both involve designing user-centric experiences. Learn about their differences, then use Figma’s design tools to get started.


Usability testing: The key to designing with confidence
Usability testing turns feedback into design clarity. Learn all about its benefits, methods, and how to run effective tests with help from Figma.