How to use AI for product design: 7 use cases
Share How to use AI for product design: 7 use cases
Explore more from
Building with AI

AI product design tools are turning abstract ideas into working prototypes, often in just minutes. With a simple prompt, designers can generate visual layouts, test interactions, and iterate faster than ever.
Learning how to use AI for product design is becoming a must-have skill for UI and UX teams. In fact, according to Figma’s 2025 AI report, 85% of designers and developers say learning to work with AI will be essential to their success in the future. As AI becomes embedded in daily workflows, it’s freeing up teams to spend less time on production and more time on strategy, vision, and problem-solving.
Read on to learn:
- How AI enhances the product design process from concept to prototype
- How to use Figma Make to create and refine designs with AI
- Tips for writing effective AI prompts that get strong results
Use case 1: User research and data analysis
User research is the foundation of strong product design, but manually gathering and analyzing insights can be time-consuming. Using AI speeds up this process and helps teams get actionable insights faster.
Tools like ChatGPT and Gemini can analyze large amounts of datasets, surface patterns, and summarize survey responses or interviews. Some AI tools can even create draft user personas or map the user journey, based on existing feedback, giving teams a faster way to align around user needs.
Use case 2: Ideation and concept creation
Once you understand your users, it’s time to explore directions. AI can help kickstart the creative process by turning text prompts into early concept sketches, layout ideas, or even interactive mockups.
Tools like text-to-image generators and AI-assisted wireframing help teams quickly visualize a product’s look and feel, often in minutes instead of hours.
At this stage, AI tools support:
- Faster creative exploration. AI helps teams generate design variations and even create mood boards to explore tone and style.
- Data-informed inspiration. It can analyze design trends and patterns to suggest what styles or layouts are resonating in the market.
- Early validation. Rough AI-generated prototypes make it easier to test ideas with stakeholders or users before investing time in final designs.
Use case 3: Prototyping
Prototyping is where early ideas and concepts take shape. With the help of AI, you can generate UI layouts, suggest color palettes, typography, and even component placements based on your product description and target audience.
Tools like Figma Make turn text prompts and wireframes into polished UI mockups, making it easier to test designs before development.
AI-powered prototyping also speeds up iteration. It can autofill placeholder content, suggest layout tweaks, and make it easier to test variations before finalizing a design. Instead of spending hours adjusting screens manually, teams can quickly explore and refine ideas, accelerating the path from concept to build.
Use case 4: Usability testing and validation
Prototypes only go so far without feedback. AI helps by analyzing user behavior, flagging friction points, and predicting usability issues before testing even begins. For example, AI models can highlight where users might get stuck, suggest improvements to layout or copy, or surface accessibility concerns.
AI can also support A/B testing by identifying which variations perform best, giving you quicker insights and more data to inform decisions. By automating parts of the usability testing process, teams can quickly validate designs and keep iterating without slowing down.
Use case 5: Product personalization
AI helps teams create more personalized and responsive products for individual users. By analyzing behavior and preferences, teams can dynamically adjust interfaces, highlight relevant features, and personalize content for different segments. This might look like adapting layouts for different user types, suggesting the next action, or highlighting the content each user is most likely to engage with.
Personalization also goes hand in hand with inclusive design. AI can flag accessibility issues, such as contrast adjustments or missing alt text, ensuring the product works well for everyone. Combined with real-time personalization, this approach helps teams create experiences that are both engaging and inclusive.
Use case 6: Manufacturing and production optimization
In hardware or physical product design, AI design tools, can help teams make faster, more informed decisions. They can analyze production data to select the best materials, forecast costs, and adjust supply chains with precision. Decisions that once took hours of analysis can now be made in minutes, making manufacturing more efficient and predictable.
Key benefits of using AI in production include:
- Less material waste and lower costs. Analysis identifies the most efficient materials and processes for each product.
- Fewer production errors. Early detection of potential issues reduces mistakes and keeps production running smoothly.
- Faster go-to-market time. Streamlined workflows and automated adjustments help bring products from concept to shelf more quickly.
Use case 7: Sustainability and lifecycle design
Sustainability is more important than ever, and AI for product development makes it easier to consider environmental impact at every stage. It can help select eco-friendly materials, minimize waste, and forecast the environmental impact of products across their lifecycle.
AI also supports lifecycle analysis (LCA) to measure carbon footprint, recyclability, and other key sustainability metrics, while still balancing performance and cost.
Some of the benefits include:
- Reduced environmental impact. Teams can make design choices that reduce carbon emissions and waste.
- Compliance with sustainability standards. AI helps ensure products meet regulatory and industry benchmarks.
- Stronger brand reputation. Sustainable design choices can improve customer trust and loyalty.
Ready to start prototyping with AI?
Experience the power of Figma Make and bring your ideas to life.
Best practices for using AI in product design
AI can speed up design, but it’s most effective when guided by clear goals and a human-centered mindset. Here’s how to get the most out of product design AI tools in your workflows.
- Set clear design goals. Define your constraints, functions, and aesthetics before prompting AI. Using SMART goals can help structure these objectives.
- Maintain a human touch. AI can accelerate tasks, but creativity and empathy still come from designers. Use AI as a helper, not a replacement.
- Validate everything. Always review AI suggestions for feasibility, ethics, and performance. Use feedback loops to make sure ideas work in the real world.
- Use AI collaboratively. Involve the whole team—design, engineering, and marketing—to keep everyone aligned throughout the process.
- Document your workflow. Track how AI influences your design decisions. Keeping a record helps with transparency, collaboration, and iteration.
How to use Figma Make in your product design workflow
Figma Make lets designers and product teams go from concept to clickable prototype in minutes. Below is a step-by-step guide to using Figma Make in your product design workflow, showing how AI fits into each stage.
Step 1: Open or import a design
Start by deciding whether to work with an existing design or begin fresh:
- Import an existing file. Click + → Attach a design to bring in a current design file.
- Start from scratch. Skip the import and type directly in the AI chat to generate layouts, copy, or interface components from prompts.
![A screenshot of the Figma Make home page, showing the option to import an existing design. ]](data:image/jpeg;base64,/9j/2wBDAAYEBQYFBAYGBQYHBwYIChAKCgkJChQODwwQFxQYGBcUFhYaHSUfGhsjHBYWICwgIyYnKSopGR8tMC0oMCUoKSj/2wBDAQcHBwoIChMKChMoGhYaKCgoKCgoKCgoKCgoKCgoKCgoKCgoKCgoKCgoKCgoKCgoKCgoKCgoKCgoKCgoKCgoKCj/wAARCAAIABQDASIAAhEBAxEB/8QAFgABAQEAAAAAAAAAAAAAAAAAAAcF/8QAIhAAAgIBBAEFAAAAAAAAAAAAAQIAAwQFBhESEwchMUFR/8QAFgEBAQEAAAAAAAAAAAAAAAAAAAEC/8QAFhEBAQEAAAAAAAAAAAAAAAAAAAFB/9oADAMBAAIRAxEAPwC5+oGfurG8NO1tNTJV15e0uAUP5wZj6Zr2+gOmVtmtSE938wPZoiW4RQKHyLMep76xXayAunz1P2IiJqUf/9k=)
![A screenshot of the Figma Make home page, showing the option to import an existing design. ]](https://cdn.sanity.io/images/599r6htc/regionalized/ac125384299353b911f377963c27c8e7f25171b5-1440x575.jpg?w=1440&h=575&q=75&fit=max&auto=format)
Step 2: Use the AI chat panel to generate a prototype
Once your design file is open, you can generate a prototype using the AI chat panel:
- Type your prompt. In the AI chat box, enter a clear description of what you want the prototype to include. For example: “Design a user dashboard for tracking workouts with charts and progress bars.”
- Submit. Click enter, and the AI will start creating a first version of the prototype.
- Preview and interact. The generated prototype appears in the preview area, where you can explore and edit elements directly.
![A screenshot of a user prompting Figma Make to create a workout user dashboard, and a preview of the result.]](data:image/jpeg;base64,/9j/2wBDAAYEBQYFBAYGBQYHBwYIChAKCgkJChQODwwQFxQYGBcUFhYaHSUfGhsjHBYWICwgIyYnKSopGR8tMC0oMCUoKSj/2wBDAQcHBwoIChMKChMoGhYaKCgoKCgoKCgoKCgoKCgoKCgoKCgoKCgoKCgoKCgoKCgoKCgoKCgoKCgoKCgoKCgoKCj/wAARCAAKABQDASIAAhEBAxEB/8QAGAAAAgMAAAAAAAAAAAAAAAAAAAQCAwj/xAAdEAACAwADAQEAAAAAAAAAAAABAgADEQQhMUFC/8QAFQEBAQAAAAAAAAAAAAAAAAAAAAL/xAAWEQEBAQAAAAAAAAAAAAAAAAAAARH/2gAMAwEAAhEDEQA/ANKcG17GcFcPses1EZ/SO8kyAFGAStf1AUqtr5CB2p787EIcolbMBIGfISto/9k=)
![A screenshot of a user prompting Figma Make to create a workout user dashboard, and a preview of the result.]](https://cdn.sanity.io/images/599r6htc/regionalized/3615ec84c8844b52ed021b3d6cd880e0b1dbf2c6-1440x757.jpg?w=1440&h=757&q=75&fit=max&auto=format)
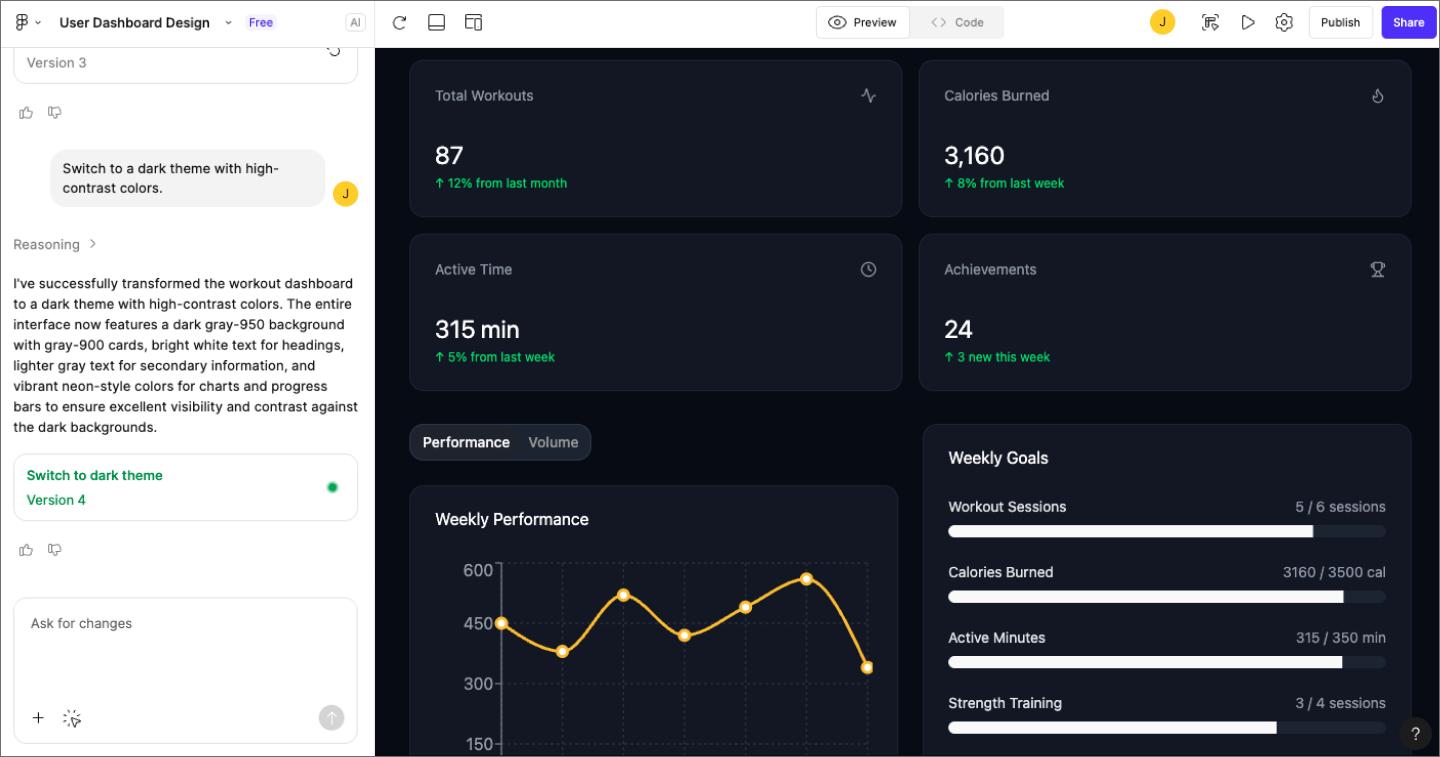
Step 3: Iterate through conversation
Continue refining your prototype directly in the AI chat panel:
- Provide specific instructions. Type requests like “Add a dark theme” or “Make the buttons rounded” to adjust the design.
- Add or reference new elements. Attach additional frames or components, paste design elements, or upload images for reference.
- See updates in real time. Changes appear in the preview area, letting you quickly review and fine-tune your design.
![Screenshot of a user prompting Figma Make to edit the layout and colors of the initial design, and a preview of the updated results.]](data:image/jpeg;base64,/9j/2wBDAAYEBQYFBAYGBQYHBwYIChAKCgkJChQODwwQFxQYGBcUFhYaHSUfGhsjHBYWICwgIyYnKSopGR8tMC0oMCUoKSj/2wBDAQcHBwoIChMKChMoGhYaKCgoKCgoKCgoKCgoKCgoKCgoKCgoKCgoKCgoKCgoKCgoKCgoKCgoKCgoKCgoKCgoKCj/wAARCAAKABQDASIAAhEBAxEB/8QAGAAAAwEBAAAAAAAAAAAAAAAAAAMFBAj/xAAfEAACAgIBBQAAAAAAAAAAAAABAgADERJBBRMyNHL/xAAVAQEBAAAAAAAAAAAAAAAAAAAAAf/EABYRAQEBAAAAAAAAAAAAAAAAAAABEf/aAAwDAQACEQMRAD8A6dR7NcvWQMxl9iVhGsOozzGN4iT+u+qn0IGluxadhq3GcQkqkkVrgkQl2j//2Q==)
![Screenshot of a user prompting Figma Make to edit the layout and colors of the initial design, and a preview of the updated results.]](https://cdn.sanity.io/images/599r6htc/regionalized/97a083aeb96ccb23e07587469dbd8dbfac857822-1440x757.jpg?w=1440&h=757&q=75&fit=max&auto=format)

Step 4: Edit with visual tools
You can also tweak things directly using Figma Make’s visual tools:
- Turn on editing. In the AI chat box, click “Point and edit” below the prompt area.
- Select and adjust elements. Click any element— text, buttons, images— in the preview area. Tweak padding, color, text, or spacing using the editing toolbar.
This way, you can quickly make precise adjustments while still taking advantage of AI suggestions.
![A screenshot of a user directly editing a design in Figma Make, using the Point and edit tool.]](data:image/jpeg;base64,/9j/2wBDAAYEBQYFBAYGBQYHBwYIChAKCgkJChQODwwQFxQYGBcUFhYaHSUfGhsjHBYWICwgIyYnKSopGR8tMC0oMCUoKSj/2wBDAQcHBwoIChMKChMoGhYaKCgoKCgoKCgoKCgoKCgoKCgoKCgoKCgoKCgoKCgoKCgoKCgoKCgoKCgoKCgoKCgoKCj/wAARCAAMABQDASIAAhEBAxEB/8QAFwAAAwEAAAAAAAAAAAAAAAAAAAQFB//EAB8QAAEEAwADAQAAAAAAAAAAAAEAAgMRBAUSISIxUf/EABYBAQEBAAAAAAAAAAAAAAAAAAECA//EABgRAAMBAQAAAAAAAAAAAAAAAAABEQIh/9oADAMBAAIRAxEAPwDC59fI/Tx5r8uMtPyK/YKQWjgGzdp2eUnXRRctqvteU3qdbj5OvD5Q7roiwVsr2hp5aURDc5zTQJQmNhjshynxsvkfqE0k/9k=)
![A screenshot of a user directly editing a design in Figma Make, using the Point and edit tool.]](https://cdn.sanity.io/images/599r6htc/regionalized/13725a7e44ce0738a59097116953dbecc53cc53a-1440x860.jpg?w=1440&h=860&q=75&fit=max&auto=format)
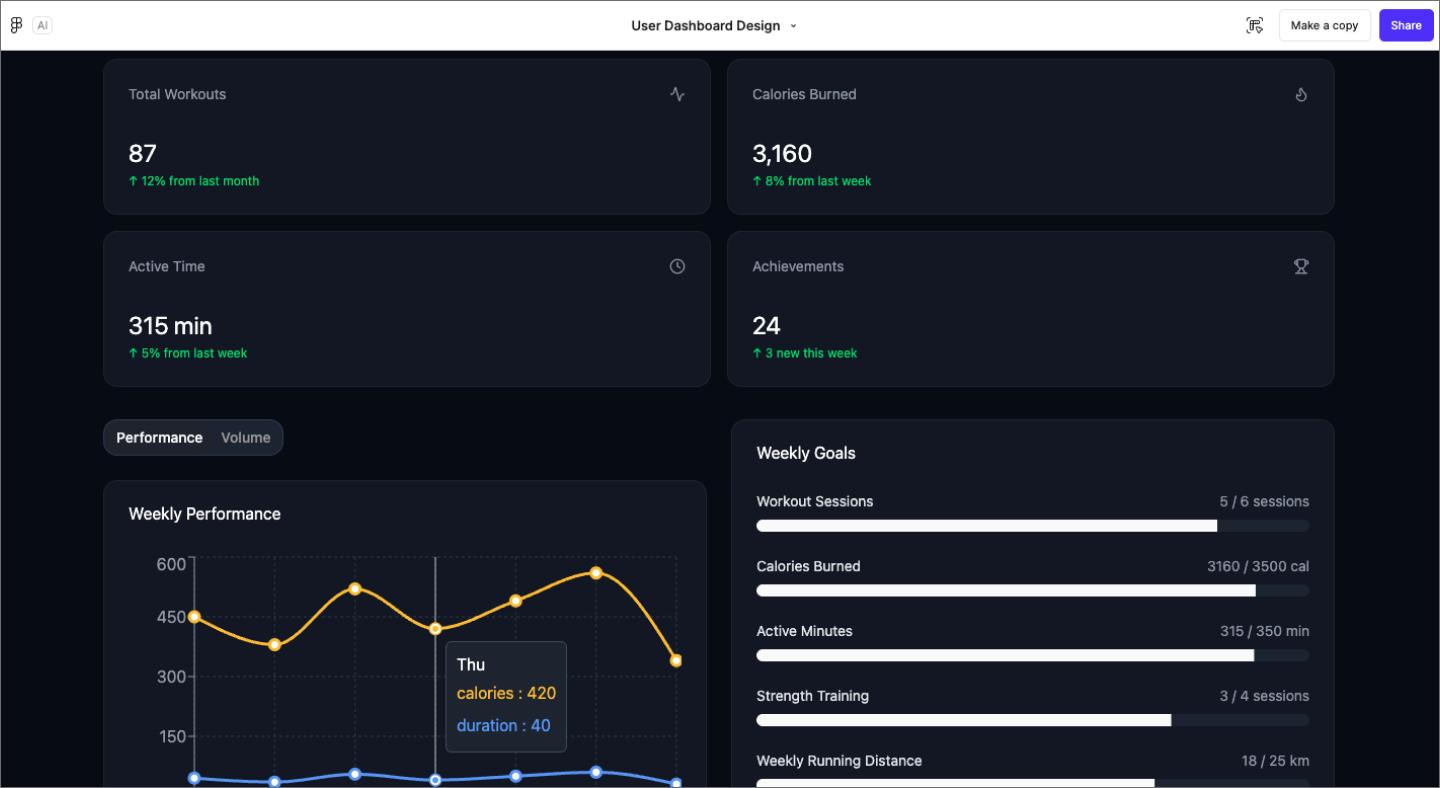
Step 5: Preview and test interactions
After refining your prototype, you can test how it works in real time:
- Select “Play.” Click the “Play” button in the top right corner of the preview area to open your prototype in interactive mode. This lets you navigate between screens just like a user would.
- Test with real or sample data. You can connect a backend to test with live data or use sample datasets to see how your prototype behaves in different scenarios.

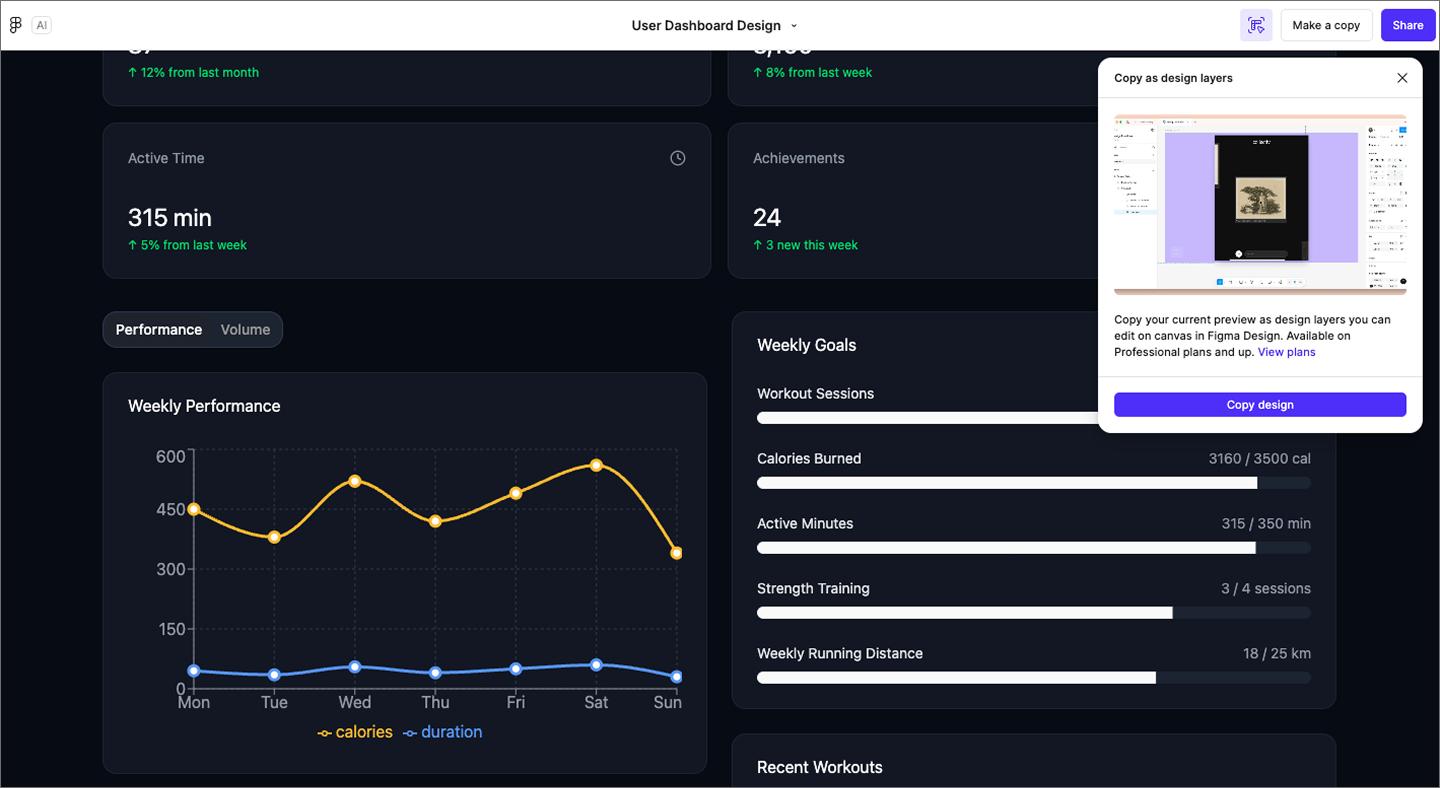
Step 6: Export or move to Figma Design
If you’re on a Professional plan or higher, you can transfer your prototype into Figma Design to continue refining or share it with stakeholders:
- Copy to the Design canvas. In the preview area, click “Copy design” to bring your prototype in as editable layers on the Figma Design canvas.
- Refine or share. Adjust layouts, tweak components, and collaborate with your team directly in Figma Design.

How to write effective AI prompts as a product designer
Strong AI prompts start with intent. Think of each prompt as a mini brief: what you’re designing, who it’s for, and how it should feel. The more context you give, the better your results.
Here’s a simple framework you can follow:
- Start with structure. Begin with a clear goal that defines the screen, function, or flow. Example: “Design a mobile checkout screen for an e-commerce app with an order summary, progress bar, and checkout button.”
- Refine tone and layout. Add style and layout cues that guide the overall feel. Example: “Make it minimalist and modern, with a muted color palette and clear hierarchy.”
- Explore variants. Ask Figma Make to generate a few versions so you can compare different UX approaches. Example: “Show two alternate layouts (one single-column and one card-based) and describe pros and cons for each.”
- Add implementation details. Once you’re happy with the concept, request specifics like component lists or code-ready notes to support handoff. Example: “Include recommended typography, spacing tokens, and component names for easy editing in Figma Design.”
With each step, you move from a broad creative direction to something actionable. Figma Make’s conversational flow makes this iterative process fast and grounded in your product’s context.
Optimize your product design lifecycle with Figma Make
AI is reshaping product design, making it easier to explore ideas, test interactions, and refine UI faster. Figma helps you bring your AI‑powered workflow to life.
Here’s how you can start using Figma right away:
- Check out Figma’s product development templates to map out features, workflows, and design iterations.
- Use Dev Mode for seamless handoff, inspection, and code-ready specs once prototypes are ready for engineering.
- Explore Figma’s UI design tool to assemble interfaces using prebuilt components and assets quickly.
Ready to optimize your product design workflows?
Turn your ideas into working code—just prompt what you want with Figma’s AI code generator.


Design system examples
Explore 12 inspiring design system examples from top companies and the Figma Community. See how teams build consistency, scale, and collaborate effectively.

What is design thinking?
Design thinking helps companies understand users better and develop innovative ideas. Learn how to apply design thinking with Figma.
From the blog


4 new ways to go from idea to product with AI tools
AI tools are changing how teams build products—from where they start to what carries through to production. Here's what that shift looks like across four organizations.
Figma Make, now on your local code
From visual editing to contextual prompting and collaboration, Figma Make is expanding how teams can design with code.


7 tips for using Figma Make credits more efficiently
While everyone’s talking about “tokenmaxxing,” we’ve compiled seven best practices to help you build smarter—without prompting more—in Figma Make.
The Figma design agent is here
Starting today, work with an agent that is built for Figma—directly on the canvas.
What the design-to-code loop unlocks
With work moving more fluidly between code and canvas, workflows aren’t just changing—they’re converging.
Workflow lab: Expanding the canvas with Figma MCP
As teams build faster, design and code can drift apart just as quickly. This workflow shows how to close that gap—bringing real product states onto the canvas so designers can shape what actually ships.